Installation
To install PHP libraries, the composer package must be installed on your computer.
Requirements
Before installation, please install the following components in your working environment.
- Composer
- Php 8.0 or higher versions
- Apache 2 or higher
- Apache Mod Rewrite
- Redis Server
- Php Redis Extension
To create an Olobase project backend application, first copy the clone link from github php repository and then paste it into your console along with the following git clone command.
git clone -b 1.x [email protected]:olomadev/olobase-skeleton-php.git example-phpInstall composer packages.
/var/www/example-php$ composer installGive 777 permision for /data/tmp cache folder.
chmod 777 -R /var/www/example-php/data/tmpIn general, we'd advise you to try setting the permissions of the cache/ directory to 755 and the files inside it - to 644. If you absolutely must use higher permissions, try using 777 for the cache/ directory and 666 for the files in it. Avoid setting the permissions of regular files to 777.
Apache2 Configuration
Enable Apache mod_rewrite plugin.
sudo a2enmod rewriteThe AllowOverride option for directories in the apache2.conf file must be All.
vim /etc/apache2/apache2.confChange this option from the default None to All.
<Directory /var/www/>
    Options Indexes FollowSymLinks
    AllowOverride All
    Require all granted
</Directory>
Create a hosts file.
cd /etc/apache2/sites-available
cp 00-default.conf example.local.conf
vim example.local.conf
In your Apache host file, the DocumentRoot configuration must be set to the yourproject/public/ folder. It is recommended to set DirectoryIndex to index.php. ServerName is set to example.local in this example.
<VirtualHost *:80>

    SetEnv "APP_ENV" "local"
    ServerName example.local
    ServerAdmin webmaster@localhost
    DocumentRoot /var/www/olobase-skeleton-php/public/
    DirectoryIndex index.php

    ErrorLog ${APACHE_LOG_DIR}/error.log
    CustomLog ${APACHE_LOG_DIR}/access.log combined

</VirtualHost>
Save your vhost file and restart the apache server.
a2ensite example.local.conf
sudo service apache2 restart
.htaccess
Configuration requires the .htaccess file as follows. This file is located in the /public folder.
Linux Host File
In this example, the project is defined as example.local in the /etc/hosts file.
127.0.1.1 example.localAfter this definition, you can access your application from your browser with the project name as follows.
http://example.local/Local Environment Configuration
To work in a local environment, copy the local.php.dist file in the /config/autoload/ folder in your project and save it with the name local.php.
<?php
declare(strict_types=1);

use Laminas\ConfigAggregator\ConfigAggregator;

return [
    // Toggle the configuration cache. Set this to boolean false, or remove the
    // directive, to disable configuration caching. Toggling development mode
    // will also disable it by default; clear the configuration cache using
    // `composer clear-config-cache`.
    ConfigAggregator::ENABLE_CACHE => false,

    // Enable debugging; typically used to provide debugging information within templates.
    'debug' => true,
    'token' => [
        // Cookie encryption
        'encryption' => [
            'iv' => '', // generate random 16 chars
            'enabled' => false, // it should be true in production environment
            'secret_key' => '',
        ],
        // Public and private keys are expected to be Base64 encoded.
        // The last non-empty line is used so that keys can be generated with
        'public_key' => '',
        // The secret keys generated by other tools may
        // need to be adjusted to match the input expected by libsodium.
        'private_key' => '',
        //
        // for strong security reason it should be less
        'session_ttl' => 15, // in minutes (TTL cannot be less then 10 minute)
        // you can reduce the time for higher security
        // for how long the token will be valid in the app.
        // in every "x" time the token will be refresh.
        'token_validity' => 1, // in minutes
        // whether to check the IP and User Agent when the token is resolved.
        //
        'validation' => [
            'user_ip' => true,
            'user_agent' => true,
        ],
    ],
    'db' => [
        'driver'   => 'Pdo_Mysql',
        'driver_options' => [
            // PDO::ATTR_PERSISTENT => true,
            // https://www.php.net/manual/tr/mysqlinfo.concepts.buffering.php
            //
            PDO::MYSQL_ATTR_USE_BUFFERED_QUERY => false,  // should be false

            // https://stackoverflow.com/questions/20079320/php-pdo-mysql-how-do-i-return-integer-and-numeric-columns-from-mysql-as-int
            //
            PDO::ATTR_EMULATE_PREPARES => false,
            PDO::ATTR_STRINGIFY_FETCHES => false,

            // Enable exceptions
            PDO::ATTR_ERRMODE => PDO::ERRMODE_EXCEPTION,
        ],
        'database' => 'olobase_default',
        'hostname' => 'localhost',
        'username' => '',
        'password' => '',
        'platform' => 'Mysql',
    ],
    'redis' => [
        'host' => 'localhost',
        'port' => '6379',
        'timeout' => 60,
        'password' => '',
    ]
];
For more detailed information about the configuration of environments, you can browse the environments section.
Generating JWT Keys
The jwt encoder uses two public and private keys, private_key when signing tokens and public_key when reading tokens. You need to create different keys for each project. You can create public and private keys using this link.
Creating the Default Database
Before running the file named default.sql in the olobase-skeleton-php project create a database named olobase_default.
CREATE DATABASE olobase_default;Then run default.sql SQL codes for this database.
Database Configuration
The example link above is for the Mysql driver for more examples you can visit the laminas-db link.
Login to Your Application
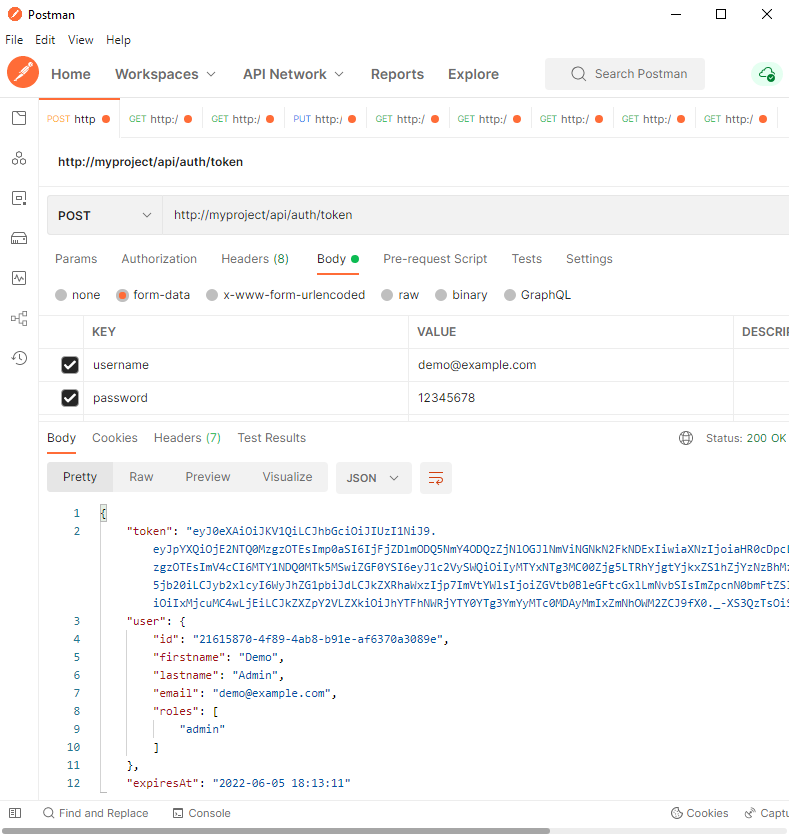
http://example.local/api/auth/tokenYou can test your application using software such as Postman as in the following example.
- Username: [email protected]
- Password: 12345678

Useful Resources About Mezzio
Olobase uses the Mezzio Framework in the backend. If you would like to get more detailed information about the Mezzio framework, you can take a look at the resources below.
| Source Type | Url | Description |
|---|---|---|
| Documents | https://docs.mezzio.dev/ | Mezzio official documentation web address. |
| Installation | https://matthewsetter.com/how-to-create-a-mezzio-application/ | Blog address written by the creator of Mezzio and containing extensive information about Mezzio installation. |